|
<< Click to Display Table of Contents >> A-A Enter Bills and Hand Printed Checks |
  
|
|
<< Click to Display Table of Contents >> A-A Enter Bills and Hand Printed Checks |
|
This feature is used to enter your bills into Frazer.
You can do one of two things, here:
1. Create an "Open Bill" - "Open Bills" are bills that you receive and want to add into Frazer and eventually show a different payment date. You may or may not have already paid them. You may also want to print to your checks from Frazer, and would create an "Open Bill" to do so. Paying these bills happens when you "print the check" in Frazer, which happens in Accounting - B. Print Checks or Change and Review Open Bills.
2. Add a "Hand-Printed Check" - Checks that you've written outside of Frazer and need to log in the system are considered "Hand-Printed Checks". Use the checkbox at the bottom of the window "Check here if this bill has already been paid" to add a Hand-Printed Check which immediately pays it. If you paid via ACH, you can check a box to indicate this as well.
You can access this screen from Accounting > A - Enter Bills and Hand Printed Checks.
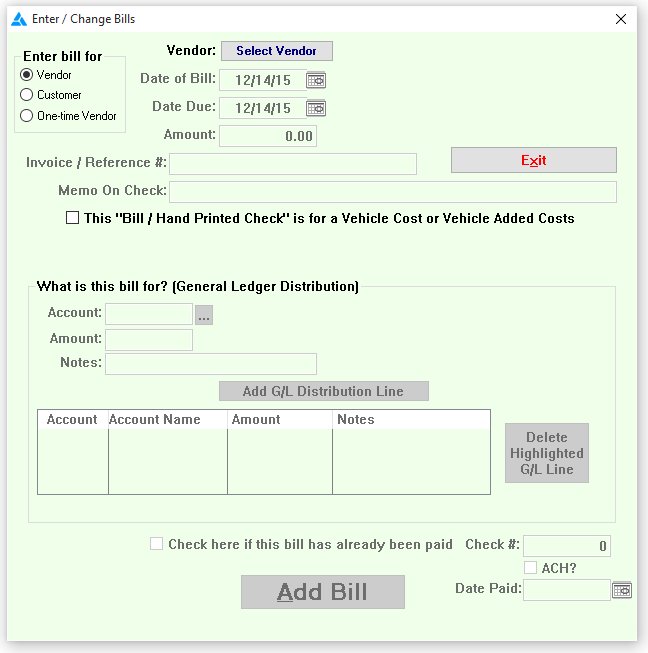
1.Fill in the information at the top of the screen.
•Enter bill for – select if this bill is for a Vendor, Customer or One-time Vendor.
•Vendor: Access the vendor file to select an existing vendor or add a new one.
•Customer: Access the customer file to select a customer.
•One-time Vendor: Enter the name and address to print on the check without adding the information to the vendor file.
•Date – the date of the invoice/bill or the date of hand-printed check.
•Due Date – the date that the invoice/bill is due. This date will likely be the same as Date Paid(bottom right) if entering a hand-printed check.
•Amount – the amount of the invoice/bill or hand check is for.
•Invoice/Reference # - Identifying number printed on vendor's invoice/bill.
•Memo On Check – displays what is entered in the Invoice/Reference # space. Enter or edit any additional information to print on the check here.
2."This Bill / Hand Printed Check" is for a Vehicle Cost or Vehicle Added Costs checkbox.
•Checking this box will open up additional options that allow you tie a bill directly to a vehicle for its purchase cost or for reconditioning.
- You can add a cost for an existing vehicle from this screen.
- You can use this part of the program to add reconditioning to existing vehicles.
- You can add vehicle and reconditioning bills from the vehicle screen itself, as well.
•Do NOT check this box if you're creating a bill for anything other than vehicle costs or added costs.
Do NOT check this box if you pay for vehicles and added costs with a liability account. (I.E. GL Account 2001 - A/P Vehicle Purchase)
3. "What is this bill for?" field / Selecting a G/L Account.
All of your transactions in Frazer can be seperated into categories or types. Those types will have a specific GL Account attached to them and will need to be connected to every bill you enter. I.E. If you use GL Account 2001 to pay for your vehicles, you would use the bill screen to pay down GL Account 2001 specifically. This field is where you enter that account. Once you've done this, add the amount, and any notes you may want. Then click "Add G/L Distribution Line".
•If splitting the amount of the bill between two or more accounts, select the first account and enter the amount that is to go towards it in the Amount space below. Then click the Add G/L button to add the General Ledger distribution. Then repeat for the next amount.
•If you make a mistake, simply click the affected GL distribution line in the box to select it for editing. Make any changes needed and re-click "Add G/L Distribution Line".
•If you need to delete a line, just click "Delete Highlighted G/L Line"
| 4. | "Check here if this bill has already been paid" Checkbox. |
• Check this box if you want to record a "Hand-Written Check". (See Above)
• Leave the box unchecked if you want to print your check from frazer, or if you'd rather show an Open Bill until you actually pay the check. (See Above) If you leave the box unchecked, you won't be able to add a check number or paid date. Click for instructions on printing checks/closing open bills.
| 5. | "Check Number, ACH Checkbox, and Date Paid" |
• "Check Number" - This field indicates the check number you used to pay the bill.
• "ACH" Checkbox - If you paid the bill utilizing ACH, or an automatic bank draft, and did NOT write a check. Use this checkbox. If you paid the bill with your Debit Card, you should leave this unchecked. Use the Check Number field to give it a unique number, like 0001. This will help set apart any Debit Card transactions, if you'd like to.
• "Date Paid" - You may need to add a bill for one date and show that it was paid on a different date. Use this field to do so.
6. "Add Bill" - Once the above information is correct and verified, click "Add Bill" to add a bill and pay it immediately (Hand-Check) or to create an Open Bill that will need to be paid using Accounting - B. Print Checks or Change and Review Open Bills.